Wednesday, July 17, 2013

display and edit methods

display():
The display method modifier is used to indicate that a method’s return value is to be displayed on a form or a report. if you want to edit the value use a edit method. the display method using Table methods,Form methods, Form DataSource methods,Report, Report Design methods.
Write your display methods on a table. You can use the same code in several forms or reports. 
display methods are called each time the form is redrawn. They should not contain complex and  time consuming calculations.
To create a display method, place the display keyword immediately in front of the method’s return type.
Ex: 
display AddressStatename stateName()
{
    return AddressState::find(this.CountryRegionId, this.State).Name;
}
display methods must have a return type. The return value is typically a calculated value (for example, a sum).
There should no parameters in a display method unless it is on a form data source where you must include the data source as a parameter. 
For example:
display boolean displayOperations(AssetGroup _assetGroup)
Note: You must use display on a form data source method when the return value is to be shown on a grid control.
AOT>Forms>AssetGroup.
edit():
The edit method modifier is used to indicate that a method’s return value is to be displayed on a form, and users can edit that value. If you don't want users to edit the value, use a display method.
Use the edit method modifier on Table methods, Form methods, Form data source methods.
Write your edit methods on a table. You can use the same code in several forms.
edit methods are called each time the form is redrawn. They should not contain complex and  time consuming calculations.
Create an edit method on a form or table.
  1. Place the edit keyword immediately in front of the method’s return type.
  2. Create a Boolean parameter called Set. It is used to determine whether the user has entered anything into the control.
  3. create a second parameter to hold the values that the user has entered into the control.
  4. If the edit method is on a form data source, create a third parameter for the data source. Place this parameter after the Set parameter.
    Ex: AOT>Table>CustTable>Methods>edit ContactPersonName

    edit ContactPersonName editContactPersonName(boolean _set, ContactPersonName _name)
    {
        return this.CustVendTable::editContactPersonName(_set, _name);
    }

    Form Level: AOT>Forms>BOMCalcSum>Methods>editCostSales

How to use query classes in table level

AOT>DataDictionary>Tables>CustTable>Methods>getCurrenicesForAllTrans

Friday, July 5, 2013

How to know version number in axapta 2009

Press Alt +M --> go to Help


The above window we have to find out easily about kernel, application version number, localization version and who are the using licensed and serial number.

Note: kernel and application version numbers  both are same that application is installed correctly.


Tuesday, July 2, 2013

Prerequisites for installing an AXAPTA-2009


Prerequisites for installing an AXAPTA-2009
Base Components
ü  Install the database on SQL Server
ü  Install application files
ü  Install an Application Object Server (AOS) instance
ü  Install a client
Prerequisites for installing an AOS instance:
ü  Microsoft .NET Framework 3.5
ü  Windows Installer 3.1
ü  Microsoft SQL Server 2005 Native Client
Prerequisites for installing a client:
ü  Microsoft .NET Framework 3.5
ü  Windows Installer 3.1
ü  Microsoft Internet Explorer
ü  SQL Server Analysis Management Objects
ü  Microsoft SQL Server 2005 Native Client
Prerequisites for installing the database on SQL Server:
ü  Microsoft .NET Framework 3.5
ü  Windows Installer 3.1
ü  Microsoft SQL Server
Prerequisites for installing application files
ü  Microsoft .NET Framework 3.5
ü  Windows Installer 3.1
Install prerequisite software on the report server:
ü  Windows SDK for Windows Server 2008 and .NET Framework 3.5
ü  Internet Information Services (IIS)
ü  ASP.NET 2.0
ü  Microsoft ADOMD.NET
ü  Windows Installer 3.1
ü  Microsoft Dynamics AX .NET Business Connector
ü  Microsoft SQL Server Reporting Services
ü  Microsoft Visual Studio 2008 Shell (isolated mode)
ü  Secure Sockets Layer (SSL)
Prerequisites for installing the analysis extensions:
ü  Microsoft .NET Framework 3.5
ü  Windows Installer 3.1
ü  Microsoft SQL Server Analysis Services
ü  Microsoft SQL Server Management Studio
ü  Microsoft SQL Server Business Intelligence Development Studio
Prerequisites for installing Enterprise Portal and Role Centers:
ü  Microsoft .NET Framework 3.5
ü  Windows Installer 3.1
ü  Internet Information Services (IIS)
ü  ASP.NET
ü  Secure Sockets Layer (SSL)
ü  Windows SharePoint Services -or- Microsoft Office SharePoint Server, Enterprise Edition
ü  SQL Server Analysis Management Objects (AMO)
ü  Microsoft Dynamics AX .NET Business Connector
Prerequisites for installing Workflow:
ü  Internet Information Services (IIS)
ü  ASP.NET 2.0
ü  Microsoft .NET Framework 3.5
ü  Windows Installer 3.1
ü  Microsoft Dynamics AX .NET Business Connector
ü  Secure Sockets Layer (SSL)
 Prerequisites for installing the debugger:
ü  Microsoft .NET Framework 3.5
ü  Windows Installer 3.1
ü  Microsoft Dynamics AX .NET Business Connector
Prerequisites for installing the .NET Business Connector:
ü  Microsoft .NET Framework 3.5
ü  Windows Installer 3.1
Prerequisites for installing the AIF Web services:
ü  Microsoft .NET Framework 3.5
ü  Windows Installer 3.1
ü  Microsoft Dynamics AX .NET Business Connector
ü  Internet Information Services (IIS)
ü  ASP.NET 2.0
Prerequisites for installing a developer installation:
ü  Install the database on SQL Server or Install the database on Oracle
ü  Install an Application Object Server (AOS) instance
ü  Install application files
ü  Install the Microsoft Dynamics AX client
ü  Install the .NET Business Connector
ü  Install the debugger


Wednesday, June 26, 2013

Navigation Forms:

Navigation Forms:

You use navigation forms to find information, open forms, and perform actions.

For example, you use a list page to find a single record or a collection of records that you want to work with.

List page: You use the form to view a list of records. You use the list page to browse records, select one or more records, and perform an action upon the highlighted record or records.

You begin list page development by identifying the data records that you want to appear in the list.

Design:
             
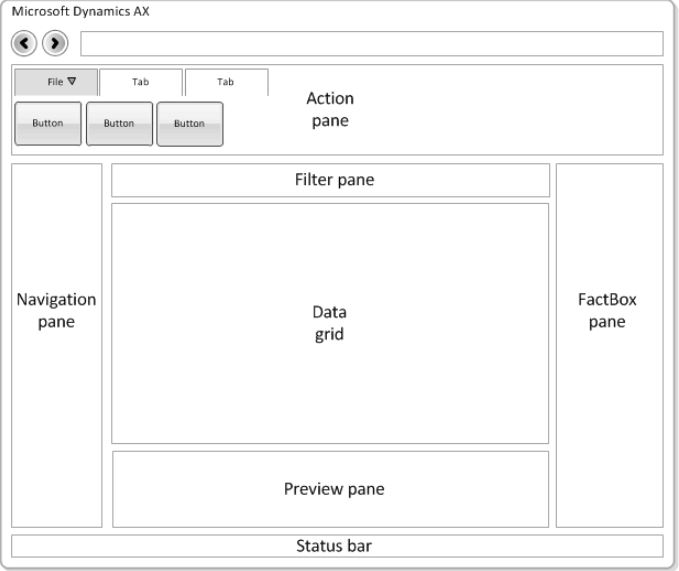
ListPage Elements :

ActionPane:The action pane is a collection of tab, button group and button controls. The buttons represent the actions that you can perform on the data records in the data grid.

FilterPane:The filter pane is a collection of controls that you use to find and view a specific record or a group of similar records. The filter pane lets you search the data records in the data grid.

DataGrid:The data grid is a control that shows specified data fields for a list of records. The data grid is automatically added when you create a new list page form.

FactBox Pane: The FactBox pane provides additional information about the items in the list and about the highlighted record in the data grid.
The FactBox pane can contain Info Parts, Form Parts, and Cue Groups.

Preview Pane: A preview pane is an optional list page feature that displays additional data about the highlighted record in the data grid. The preview pane enables you to view additional data fields from a specific record without having to open that record in a new form.

How to create a ListPage:

http://msdn.microsoft.com/EN-US/library/cc586969.aspx

Area page:  An area page is a Microsoft Dynamics AX navigation page that displays menu items that link to list pages, content pages, forms, reports, classes, jobs, and queries. To view an area page, click a module button in the Navigation Pane. The area page opens in the client content pane.

Features: 
Groups: An area page typically contains one or more groups that organize menu items by type. Common area page group names include Common, Journals, Inquiries, Reports, Periodic, and Setup.

Lists: An area page group contains a list of menu items. Each menu item opens a specified list page, content page, form, report, class, job, or query. When you add a menu item to an area page, you must specify a group for that menu item.
To specify a group for a new menu item, use the following guidelines:
  • If the menu item represents a list page or content page, set the IsDisplayedInContentArea property to Yes.
  • If the menu item represents a non-list page or content page form, set the IsDisplayedInContentArea property to No.
  • If you want to display a menu item in a specific group, use the AOT to add that menu item to the submenu that represents that group.

ContentPages:  A content page is a navigation page that enables the client content pane to display data in a format other than a list.
For example, a content page can use a tree control to represent the organizational hierarchy of a group of records.


About forms in Axapta-2012

Form: redesigned forms – a brand new look in Axapta 2012. 
A form is a window that you open from the Microsoft Dynamics AX client workspace that shows information and enables you to perform actions.
For example, the following figure shows the form you use to view and enter information about a customer. Notice how the form has tabs, fields, and buttons that you can use to view, update, and perform actions with a customer record.

Form Templates:

To create a form that implements a design pattern, you use a form template.
The template generates a new form that has the basic structure and components specified by the design pattern.
The template reduces the number of steps that you have to complete to create the new form.


List page: Use the template to create a list page you can use to find, analyze, and performs actions on master data.


Example: CustTableListPage To open this form: Under Accounts Receivable, click Common > Customers > All Customers.

DetailsFormMaster(Detail form): Use the template to create a Details form to view, edit, and act on master data.


Example: CustTable. To open this form: Under Accounts Receivable, click Common > Customers > All Customers, and then double-click an entry in the list.

DetailsFormTransaction (Details form with lines): Use the template to create details form with lines to view, edit, and act on master data that has line items.


Example: SalesTable. To open this form: Under Accounts Receivable, click Common > Sales Orders > All Sales Orders, and then double-click an entry in the list.

Dialog: Use the template to create a dialog window that provides a response to a question.


Example: DirPartyQuickCreateForm .To open this form: Under Accounts Receivable, click Common > Customers > All Customers. On the Action pane, in the New group, click Customer.

DropDialog: Use the template to create a drop dialog form to perform an action with data.

Example: HcmWorkerNewWorker. To open this form: Under Human Resources, click Common > Workers > Workers. On the Action pane, in the New group, click Hire New Worker.

Simple List: View, enter, and update records that appear as a list of records in a grid.


Example: CustGroup. To open this form: Under Accounts Receivable, click Setup > Customers > Customer Groups.

SimpleListDetails: Use the template to create a simple list and details form to view, edit, and act on dependent and reference data.


Example: CustPosting To open this form: Under Accounts Receivable, click Setup > Customer Posting Profiles.

TableOfContents: Use the template to create a table of contents form to view and edit configuration or setup data.


Example: CustParameters To open this form: Under Accounts Receivable, click Setup > Accounts Receivable Parameters.

Components:


Methods: You add or override X++ methods for the form. You can use X++ to customize the appearance and behavior of the form.

Data Sources: You specify the database query, table, or view that the form uses to retrieve the data that appears in the form.

Parts: You add Parts that appear on the form. A Part is a specialized type of control that provides information related to the record that appears in the form. List pages and details forms have a FactBox pane or preview pane where the Parts appear.

Designs: You add the controls that appear on the form to the Design node of the form.

Permissions: You specify access levels for the securable objects that appear in the form.


Saturday, June 22, 2013

Joins and LinkTypes in Axapta

Here I have created Two Tables 1.Master 2.JoinDetail

I have created a Form using the above two tables. This form demonstrates the effects of joining two datasources in a form.

  Setting the property JoinSource and LinkType in form JoinDetail DataSources level 
InnerJoinRetrieves a record from the main table that matches records in the joined table and vice versa.
There is one record for each match. Records without related records in the other data source are eliminated from the result.
OuterJoin: Retrieves records from the main table whether they have matching records in the joined table.
ExistJoin: Retrieves a record from the main table for each matching record in the joined table.
The differences between InnerJoin and ExistJoin are as follows:
  • When the join type is ExistJoin, the search ends after the first match has been found.
  • When the join type is InnerJoin, all matching records are searched for.

    NotExistJoin: Select records from the main table that do not have a match in the joined table.
    Active: The data source is updated immediately when a new record in the parent data source is selected. Continuous updates consume lots of resources.

Passive: Linked child data sources are not updated automatically. Updates of the child data source must be programmed on the active method of the master data source.
Delayed: A pause is inserted before linked child data sources are updated. This enables faster navigation in the parent data source because the records from child data sources are not updated immediately.
 For example, you can scroll a list of orders where you do not want to review the lines associated with the order until you stop scrolling.

Reference: AOT>Form>tutorial_Form_Join


update_recordset with joins

 update_recordset with joins update_recordSet storeTransfer         setting      TransactionId = transfertable.TransferId     join transfert...